
Leather Bag Edge Finishing: Paint, Burnishing and QC
Leather Bag Edge Finishing: Paint, Burnishing and QC
Edges are the most handled surface on a leather bag and the hardest part of it to finish consistently. A customer reads the edge before they read the stitching: a thick, ragged, or uneven edge announces cheap construction faster than any other detail.
As a bag manufacturer, we treat edge finishing as a discipline in its own right. This guide covers how edges are constructed, how they are painted, burnished, folded and controlled — and how edge defects actually appear on the production floor.
An edge that is thick, wavy, or cracking tells a customer more about a bag than any logo printed on it. It is the detail that cannot be hidden by photography.
- Why Edges Decide Quality
- Edge Construction: What You Are Finishing
- Preparation Before Any Finish
- Edge Paint: The Dominant Method
- Burnishing and Wax Finishing
- Edge Paint or Burnishing: A Decision Matrix
- Edge Finish Chemistry and Adhesion
- Quality Control for Edges
- Common Edge Defects and Their Causes
- Production Planning and Cost
- Edge Finishing by Bag Type
- Care, Wear and Customer Expectations
- Edge Finishing in Sampling and Production Ramp
- Repair and Refinishing of Edges
- Frequently Asked Questions
- The Bottom Line
Why Edges Decide Quality
Edge finishing is a small share of assembly time and a large share of perceived quality.
The Edge Is What Hands Find
Customers touch edges constantly without noticing that they are doing it.
A hand slides along the top edge of a tote, thumbs the rim of a wallet, grips the flap of a diaper bag. Each of those contacts evaluates roundness, smoothness, thickness and temperature. Edges are judged continuously and unconsciously, which is why poor finishing is felt long before it is seen.
Where Edge Failures Appear
Edge failures show up in a predictable order.
The first sign is usually a dull or dirty surface from handling. Then come small chips at the corners where the finish is thinnest. Cracking appears on edges that flex, such as flap rims and strap ends. Complete peeling follows where adhesion was inadequate. Finally, the exposed fibre edge absorbs moisture and darkens unevenly.
Why Edge Work Is Underestimated
Edge finishing is under-planned because it looks like a cosmetic step.
It is often treated as something applied at the end of assembly, when in reality the construction of the edge — its thickness, its skiving, its roundness — determines whether any finish can look good. Buying a better edge paint does not fix an edge that was cut and assembled badly.
Edge Construction: What You Are Finishing
There is no single “edge” on a bag, and each type behaves differently.
Open Cut Edges
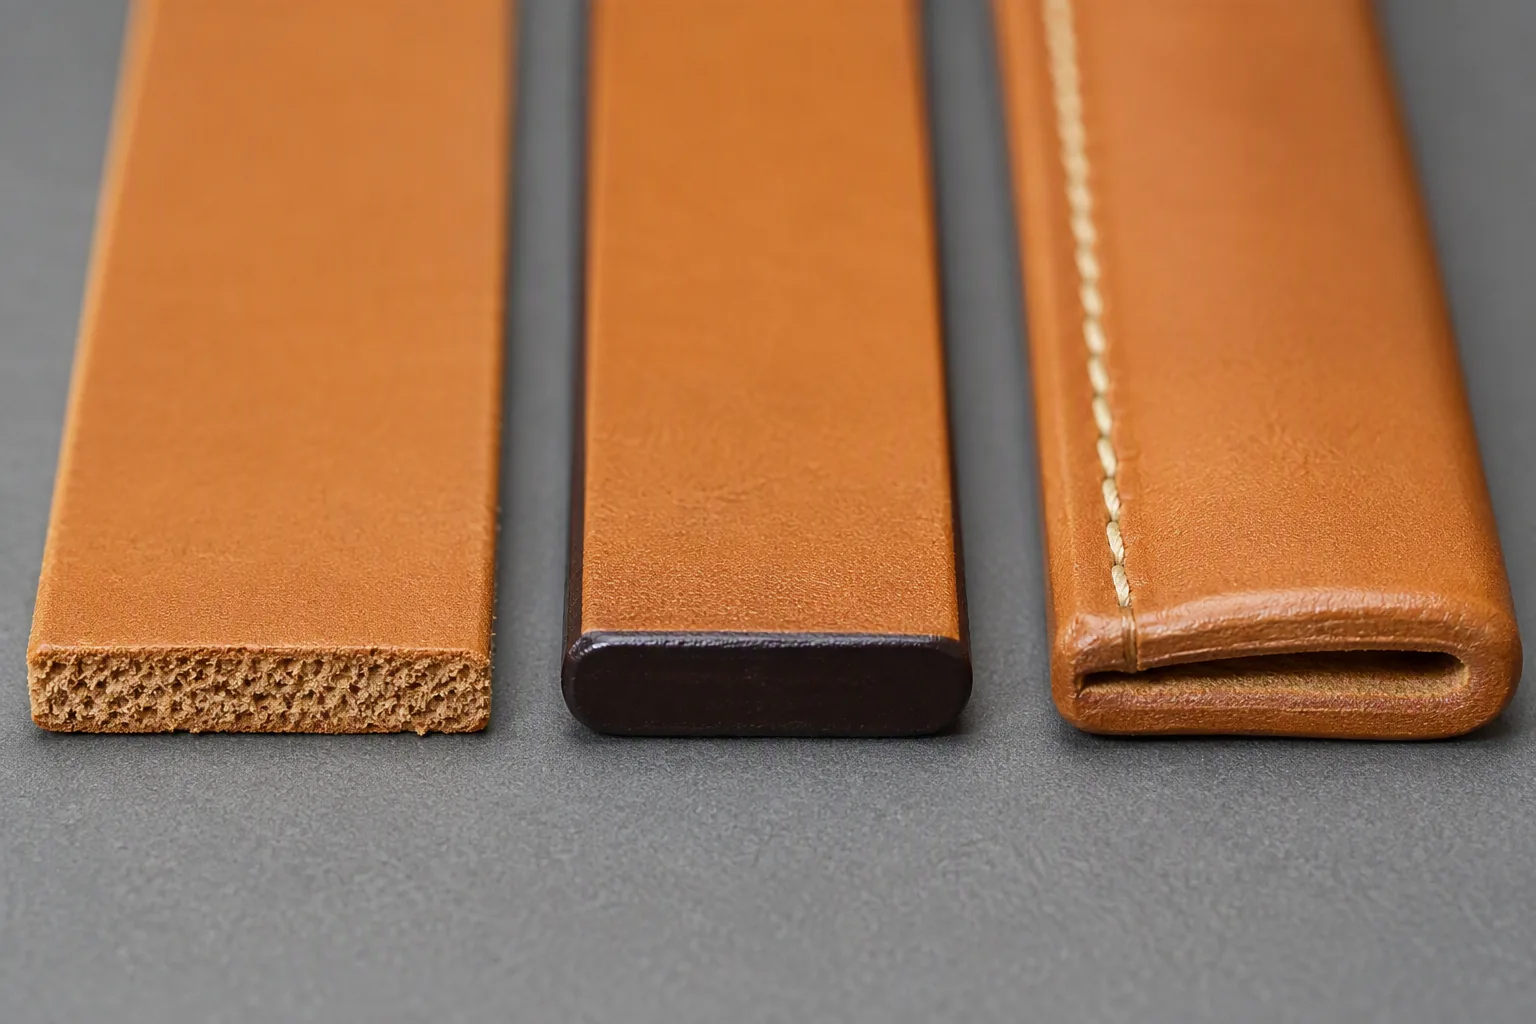
Open cut edges show the leather’s internal fibre structure.
They are the most common edge on simple bags, and the most demanding to finish because the fibre edge absorbs finish irregularly. The finish must build enough body to seal the fibres while remaining flexible. Hard, heavily built finishes on open edges are the classic recipe for corner chipping.
Folded and Turned Edges
Folding hides the cut edge and produces a soft, durable rim.
The edge is turned over and stitched, so what the customer touches is the leather’s grain surface rather than a finished fibre edge. Folding needs additional material allowance and adequate skiving at the fold, and it changes the silhouette of the bag, which is why it is decided at design stage rather than at finishing.
Bound and Piped Edges
Binding and piping add a separate component along the edge.
A strip of leather or fabric wraps the edge, or a piped cord runs inside the rim for structure and shape. These constructions look refined and protect the edge itself, but they add parts, operations and alignment requirements, and any inconsistency in the binding shows as a wavy rim.
Skived and Laminated Edges
Some edges are reduced in thickness before being finished.
Skiving thins the edge so it can be folded, bound, or finished into a slim profile. Laminating two layers and finishing them as one edge is common on structured panels. Both methods demand accurate skiving: over-thinned edges tear and show through, while under-thinned edges produce a bulky rim that cannot be smoothed.
Preparation Before Any Finish
The finish can only be as good as the edge it is applied to.
Cutting Quality Sets the Ceiling
A ragged cut cannot be finished into a clean edge.
Die cutting produces more consistent edge geometry than hand cutting, and a sharp, correctly maintained die matters more than cutting speed. On hand-cut edges, blade condition and cutting angle determine how much sanding is needed later, and excessive sanding rounds the geometry that the design specified.
Skiving and Thickness Control
Thickness variation is the root cause of most uneven edges.
If the edge thickness varies along a panel, the finish builds differently in different places, and the defect appears only after the finish is applied. Skiving to a controlled thickness with a measured target — rather than to a visual impression — prevents most of it.
Sanding and Levelling
Sanding creates the surface the finish will bond to.
Progression from coarser to finer grit levels the edge, removes cut marks, and opens the fibre so the finish can key into it. Rounded edges are produced by sanding, not by the paint itself, so the roundness of the finished edge is decided at this stage.
Cleaning and Degreasing
Dust and oils are the most common cause of poor adhesion.
Sanding dust left on the edge, or oil transferred from hands, blocking agents, or leather conditioning, prevents the first coat from bonding properly. Cleaning immediately before finishing, with a suitable solvent or cleaner, is a small step that eliminates a large defect category.
Edge Paint: The Dominant Method
Edge paint is the default finish on production leather goods, and for good reason.
What Edge Paint Is
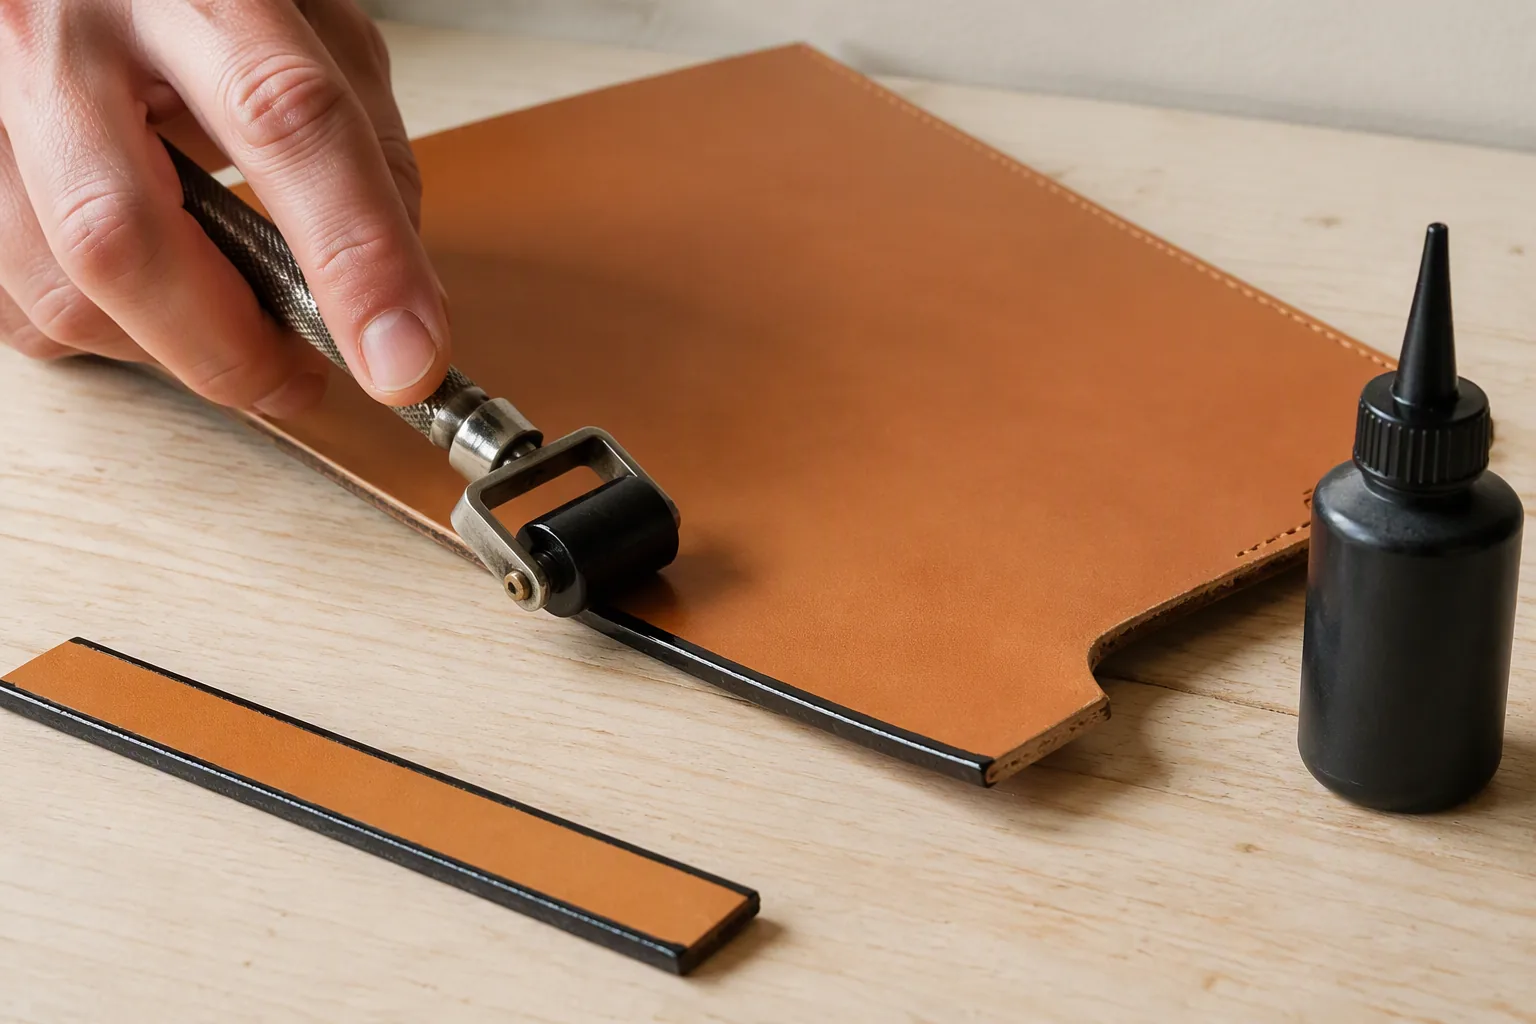
Edge paint is a pigmented coating formulated to seal and colour a cut edge.
It is not ordinary paint. A good edge paint combines pigment for colour, a binder for film formation, and plasticisers or flexible resins so the film can move with the leather instead of cracking. It is applied in multiple thin coats, each dried, until the edge is sealed, smooth and level.
Application Methods
Application method determines consistency and cost.
- Roller applicator — small hand rollers give fast, even coverage on long straight edges
- Brush or dauber — practical for short runs, curves and touch-up, but heavily operator-dependent
- Dip or flow methods — used rarely, and mainly on small components in high volumes
- Automatic edge coaters — machine application for large runs, with high consistency and high setup cost
- Spray — occasionally used for large areas, requiring masking and ventilation
Coats, Drying and Build
Edge paint is built up in thin layers, not applied in one thick pass.
Two to four coats is a normal range for a clean production edge, with light sanding between some coats to remove ridges. Drying between coats cannot be rushed; applying the next coat too early produces a soft film that sags, traps solvent and later cracks. Racks, timing and ambient conditions are part of the process, not accessories to it.
Common Application Defects
Most edge paint defects are process defects rather than material defects.
Uneven coverage comes from inconsistent application speed or a worn applicator. Bubbles come from applying too thickly or too fast. Ridges come from insufficient sanding between coats. A soft, dentable finish comes from thin build or insufficient drying. Nearly all of them are visible in a sample run before production, which is where they should be caught.
Burnishing and Wax Finishing
Burnishing is the older, more tactile approach, and it remains the right answer for some leathers.
How Burnishing Works
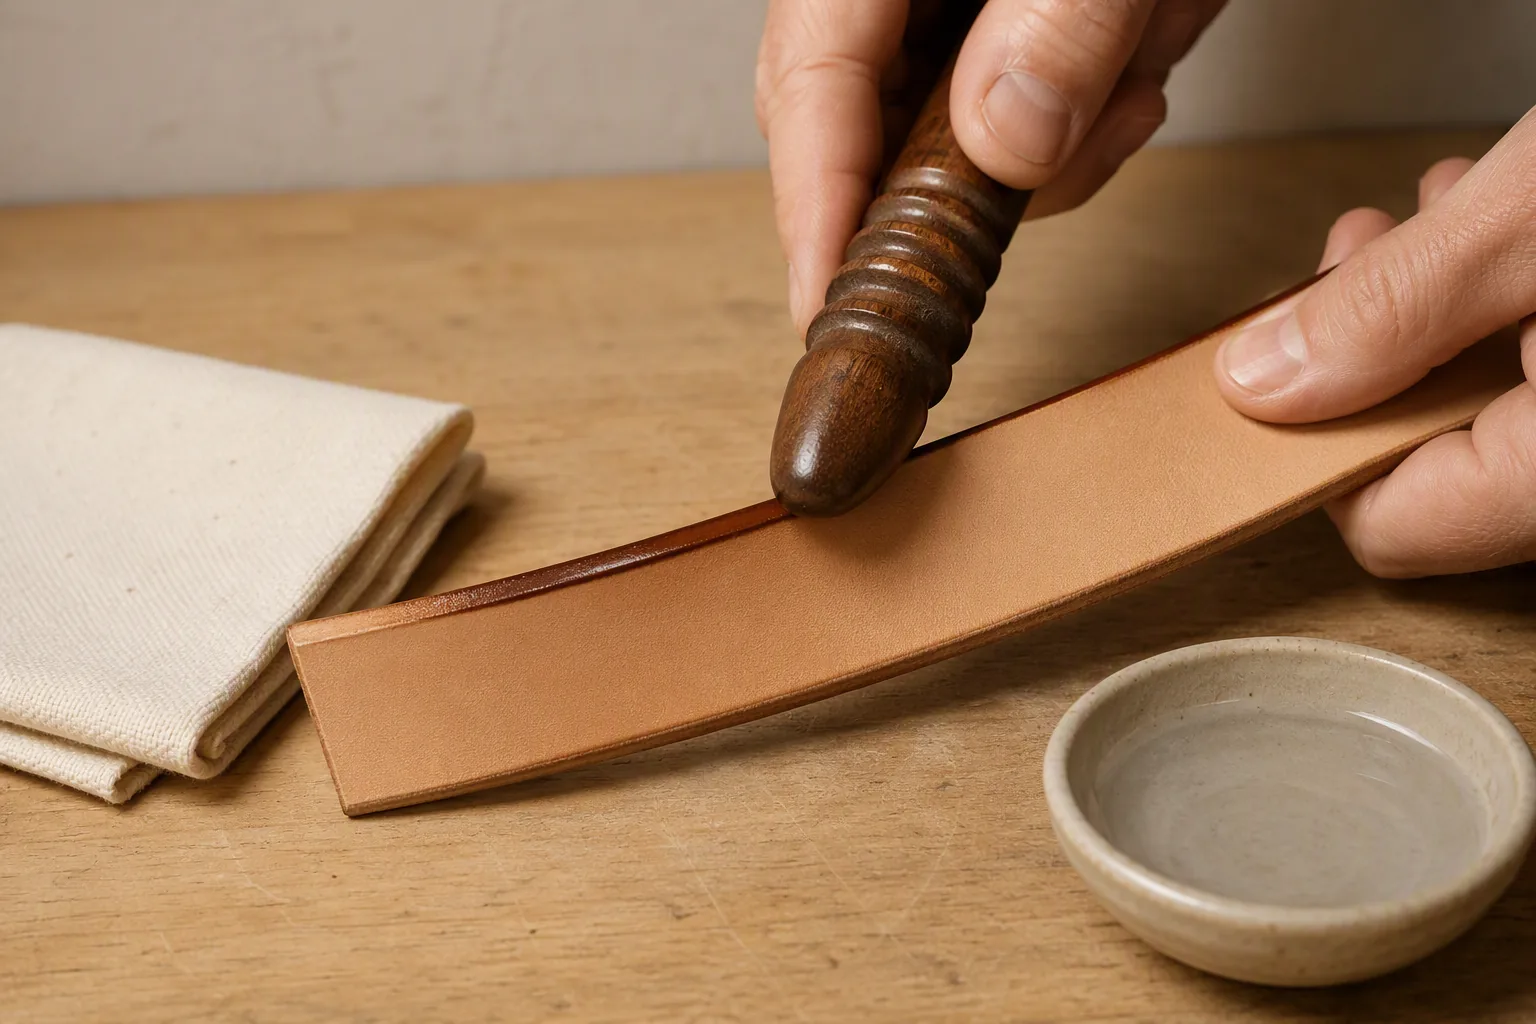
Burnishing uses friction and moisture to consolidate the fibre edge itself.
The edge is dampened lightly, then rubbed rapidly with a hard tool — traditionally wood, bone or canvas — until heat and pressure flatten the fibres into a smooth, slightly glossy surface. The finish is the leather, not a coating on top of it, which is why burnished edges age rather than peel.
Which Leathers Burnish Well
Burnishing is a property of the tannage, not a technique that works everywhere.
Vegetable-tanned leathers burnish readily because their fibre structure consolidates under friction. Chrome-tanned leathers, heavily finished leathers, and soft or oily leathers generally do not: their edges stay fuzzy or take only a partial polish. Expecting a burnished edge on an unsuitable leather is one of the most common mismatches in bag development.
Tools and Process
The process is simple and depends on consistency rather than equipment.
- Edge slicker in wood or bone, sized to the edge thickness
- Canvas cloth for the final friction polish
- Light moisture — water, or a gum or wax solution depending on the finish desired
- Wax or edge dressing to seal and add sheen after burnishing
- Consistent pressure and speed, which is what makes the result repeatable
Limits of Burnishing
Burnishing has real limits that should be understood before it is specified.
It is difficult to produce a uniform, fully opaque colour, so strongly coloured edges are better served by paint. It is labour-intensive on long edges. It offers limited protection against water compared with a proper film finish. It also shows handling marks more readily, because the surface is the leather itself.
Edge Paint or Burnishing: A Decision Matrix
The choice is driven by leather, design intent and production volume.
| Factor | Edge paint | Burnishing | Folded or bound edge |
|---|---|---|---|
| Suitable tannage | Any | Mainly vegetable-tanned | Any |
| Colour options | Full range, opaque | Limited, natural tones | Depends on material |
| Water resistance | Good | Limited without wax | Good |
| Crack resistance on flex | Depends on formula and build | High | High |
| Labour intensity | Moderate to high | High | High |
| Consistency at volume | Good with process control | Operator-dependent | Moderate |
| Repairability | Good, over-coatable | Difficult | Requires re-stitching |
| Best use | Colour-critical, high-wear edges | Heritage and natural leather goods | Structured, refined silhouettes |
When Edge Paint Wins
Edge paint is the right choice when colour and uniformity matter most.
Coloured bags, dark edges on light leather, high-wear edges on daily-use products, and any style where the edge is a visible design line all favour paint. It also scales better than burnishing in production, because it depends less on individual operator feel.
When Burnishing Wins
Burnishing suits natural, undyed and heritage styles.
Vegetable-tanned bags marketed on their material, wallets and belts where the edge is part of the character, and products where repair and refinishing are expected all suit a burnished finish. It reads as craft rather than as coating, which is precisely the point.
Hybrid Approaches
Many production edges combine methods.
A common approach is to seal and smooth the fibre edge, burnish lightly for structure, then apply a thin coloured coat over the top. Others burnish the edge and apply wax only, keeping the natural tone. The combinations are legitimate as long as each step’s purpose is understood and the result is tested for flex cracking.
Edge Finish Chemistry and Adhesion
Adhesion is where most edge finish problems originate.
Water-Based and Solvent-Based Systems
The carrier system affects process, safety and performance.
Water-based edge paints are lower in odour and easier to handle, with increasingly good performance, but they are more sensitive to humidity during drying. Solvent-based systems dry faster and can be more forgiving in humid workshops, at the cost of ventilation requirements and operator protection. Neither is universally better: the choice should follow workshop conditions, volume and the finish performance required.
Priming and Adhesion
A finish bonds to a prepared surface, not to a raw fibre edge.
Priming or a diluted first coat penetrates the fibre and creates a key for later coats. Skipping it is tempting because the second coat looks acceptable, and the failure appears months later when the finish lifts in one piece. On dense or heavily finished leathers, priming requirements are higher, and some leathers need a mechanical preparation instead.
Flexibility and Cracking
An edge finish must move with the leather.
The edges that crack first are always the ones that flex: flap rims, strap ends, wallet spines, bag mouths. Cracking is caused by a finish that is too hard, built too thickly, or insufficiently plasticised for the amount of movement in that particular edge. The fix is in formulation and build, not in more coats.
Colour Matching and Touch-Up
Edge colour should be specified as a reference, not as a word.
Approved physical references for edge colour, gloss level and edge thickness eliminate most disputes, because they allow a finished edge to be compared rather than described. Touch-up at the end of assembly is normal in production, but it should be a defined operation with a matching colour rather than a creative repair by whoever finds the defect.
Quality Control for Edges
Edges need their own inspection standard, separate from general stitching checks.
Visual Standards
The visual standard should define what an acceptable edge looks like precisely.
Coverage should be complete, with no visible fibre or base colour showing through. The edge should be level, with no waves, ridges or steps where panels meet. Corners should be fully covered, since they are the first place to fail. Gloss should match the approved reference, not the operator’s judgement.
Flex and Crack Testing
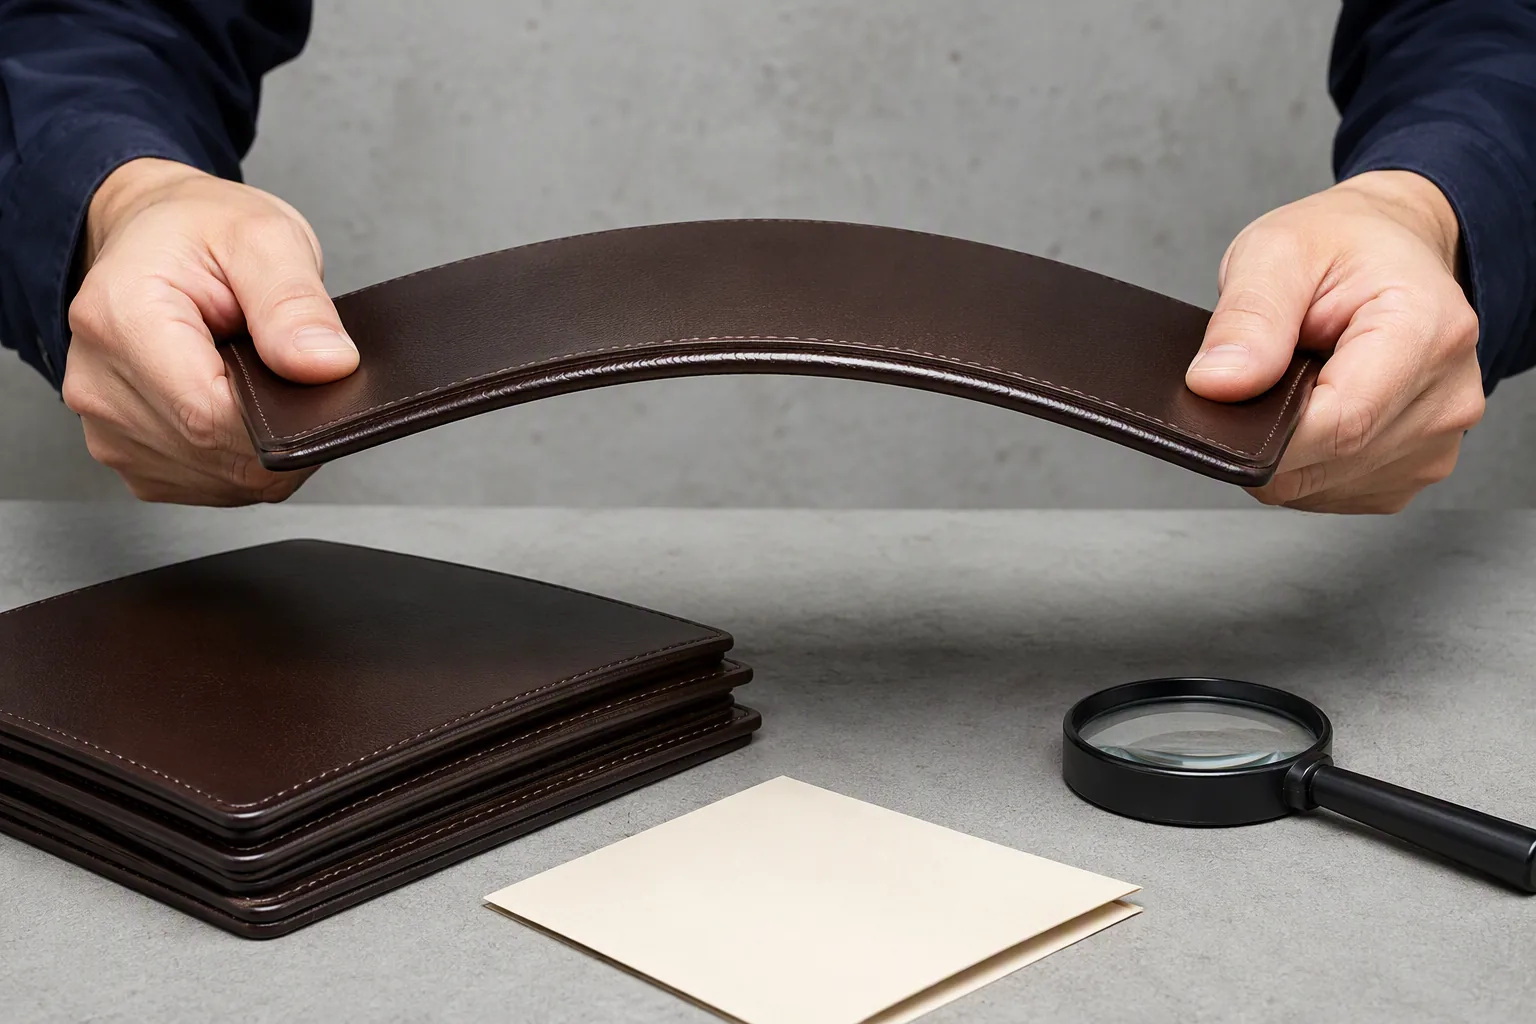
Flex testing finds cracking before the customer does.
Bending a finished edge over a small radius and inspecting it under light reveals hard or brittle finishes within seconds. Testing at corners and flap rims matters most, because that is where flex stress concentrates. Recording results per batch turns an occasional check into a comparable measurement.
Thickness and Evenness
Edge thickness is a measurable specification, not a matter of taste.
Measuring the finished edge at several points along its length detects build variation, and comparing against the approved sample confirms the profile is correct. Keeping thickness within a defined tolerance prevents the situation where an edge is technically covered but visually wrong.
Adhesion and Rub Testing
Adhesion can be tested simply and should be.
A firm rub with a thumb or a light scrape test reveals a finish that will lift, and a small destructive test on a sample panel confirms the bond strength before a batch is accepted. These checks take seconds and eliminate the most expensive type of edge complaint.
Common Edge Defects and Their Causes
Edge defects are highly repeatable, which makes them preventable.
| Defect | Root cause | Prevention |
|---|---|---|
| Uneven coverage | Inconsistent application speed or worn applicator | Controlled application and tool replacement |
| Ridges and steps | Insufficient sanding between coats | Sand between coats to level |
| Corner chipping | Thin finish at corners, rounded geometry missed | Extra attention and build at corners |
| Cracking on flex | Finish too hard or built too thick | Match formula and build to edge flex |
| Peeling in one piece | Poor preparation or missing primer | Clean, prime and control sanding dust |
| Bubbles in the film | Applied too thickly or too fast | Thin coats, correct drying time |
| Dull, dirty surface | Handling before full cure | Cure time and handling discipline |
| Wavy rim on bound edges | Misalignment during binding | Jig or guide for consistent alignment |
Diagnosing a Defect
Diagnosis should start from the failure mode rather than the finish brand.
Peeling in sheets points to adhesion; cracking along a flex line points to flexibility; chipping at corners points to build and geometry. Identifying the mechanism narrows the fix to preparation, formulation, or application — and prevents the common mistake of changing the coating while the real cause sits in the sanding step.
Preventing Rework
Rework on edges is expensive because it happens after assembly.
Applying finish, discovering a defect, sanding it back and refinishing takes several times the original operation and risks damaging the leather around the edge. Prevention is therefore structural: correct skiving, consistent sanding, defined coat counts, and inspection before the panel enters final assembly.
Production Planning and Cost
Edge finishing is a schedule constraint as much as a cost line.
Labour and Handling Time
Edge finishing is the most handling-intensive finishing operation on a leather bag.
Every coat requires application, drying, sanding where specified, and further handling. A four-coat edge on a large tote can consume more finishing labour than the stitching of the same panel. That time is real and should be estimated during development rather than discovered during the first production run.
Drying Space and Racks
Drying is a physical constraint on throughput.
Wet edges must be kept apart from one another and from other panels, which means racks, spacing and floor area. In humid conditions, drying time extends and throughput drops. Factories that plan finishing capacity without planning drying space produce edge defects on their busiest days.
Cost Share and Rework Rates
Edge finishing costs are dominated by labour time and rework.
Rework rates are the number to watch, because they compound: a defect found after assembly can cost several times the original finishing time. Tracking rework by defect type shows whether the problem is preparation, formulation, or application — and which change actually fixed it.
Edge Finishing by Bag Type
Different products load their edges differently, so finishing priorities change.
Diaper Bags and Family Bags
Family bags are exposed to moisture, wipes and constant handling.
Edges on the mouth, the flap rim and the base get wiped, flexed and packed repeatedly. A well-sealed, flexible painted edge with generous build at the corners performs best, while fold-over construction at the mouth reduces exposed fibre. Water resistance is a genuine functional requirement here, not a decorative preference.
Backpacks
Backpack edges take abrasion and weather rather than constant hand contact.
Base edges, side panels and lid rims rub against surfaces, so abrasion resistance and sealing matter more than gloss. Burnished edges are unusual on technical backpacks for that reason; a durable painted or bound edge is the practical choice, and reinforcement at the base corners extends life noticeably.
Totes and Handbags
Totes and handbags are judged on how their edges look and feel.
The rim of an open tote and the flap rim of a handbag are highly visible, so uniformity, colour accuracy and gloss control carry an outsized share of perceived quality. A common approach is a painted edge on straps and panel joints with a folded or bound rim where the silhouette allows it.
Wallets and Small Goods
Small leather goods demand the highest edge precision.
Edges are short, numerous and close to the customer’s eye, and components are thin, so thickness variation is immediately visible. Multi-coat painted edges with sanding between coats are standard, and edge thickness tolerance is tight because several edges sit next to each other within a few centimetres.
Care, Wear and Customer Expectations
Managing expectations protects a good edge finish.
What Wear Is Normal
Some edge change over time is normal and should not be presented as a defect.
A slight softening of gloss, minor darkening from handling, and gentle wear at the most handled corner are all expected on a leather product used daily. What is not normal is cracking within weeks, peeling in sheets, or missing coverage at corners on delivery.
Care Advice for Edge Finishes
Simple guidance keeps edges in good condition.
- Wipe edges dry after exposure to rain rather than letting moisture sit
- Avoid solvent-based cleaners, which attack the finish film
- Avoid abrasive polishes on painted edges
- Keep the bag out of prolonged direct heat, which softens finishes
- Report cracking or lifting early, while a small repair is still possible
Where the Warranty Line Sits
A clear line between wear and defect prevents most claims.
Documenting the standard at the approved sample stage — coverage, gloss and flex performance — gives customer service a reference to compare against. With that, normal patina and genuine finishing defects can be distinguished consistently rather than decided case by case.
Edge Finishing in Sampling and Production Ramp
Edge finishing is one of the last operations to stabilise when a style moves into production.
Approving an Edge Standard
The edge standard should be frozen at the sample stage, not improvised later.
The approved sample should record the method, the number of coats, the colour and gloss reference, and the finished edge thickness. Without that record, a production edge can be perfectly executed and still wrong, because there is nothing to compare it against. Physical references are the only reliable way to hold colour and gloss across batches.
Training and Operator Consistency
Edge finishing quality depends on operator consistency more than on equipment.
Application speed, pressure and coat thickness are all in the operator’s hands unless the process is machine-applied. Training against the approved sample, with a short visual checklist at the station, reduces the natural drift that appears after a few hundred units. Rotating operators through edge work without training is one of the most common causes of inconsistent coverage.
Ramp-Up Checks
The first production batches deserve heavier edge inspection.
Increasing the inspection rate during the first run catches systematic problems while they are still correctable — a formulations issue, a drying constraint, or a sanding step being skipped under time pressure. Once several batches hold the standard, inspection can return to normal levels with confidence.
Repair and Refinishing of Edges
Edges are the most repairable part of a leather bag, which is worth planning for.
Touch-Up Versus Refinish
Most edge problems are repairable, but the two repairs are different operations.
Touch-up adds a small amount of matching finish to a localised defect such as a scuffed corner, and it can be done in seconds at the end of assembly. Refinishing removes the existing finish, re-sands the edge and rebuilds the coats. Touch-up is maintenance; refinishing is a workshop operation, and both should be documented so the right one is applied.
Repair-Friendly Construction
Some edge constructions are far easier to repair than others.
Edges that can be re-sanded and re-coated without disturbing stitching are straightforward to refinish. Bound edges can often have the binding replaced. Folded edges that have worn through require the seam to be opened, which is a much larger job. Where long product life is a brand promise, choosing refinishable edge construction pays off years later.
What Repair Records Reveal
Edge repair records are a direct read on production quality.
If refinishing requests cluster on one style, one colour or one market, the pattern usually points to a specific cause: a formula that is too hard for a flexing edge, insufficient corner build, or a humid market exposing limited water resistance. Repair data is the cheapest quality audit a factory can have, because the customer has already done the field testing.
Frequently Asked Questions
What is the best edge finish for a leather bag?
It depends on the leather and the design. Edge paint gives the most control over colour and uniformity, burnishing suits vegetable-tanned leathers and natural styles, and folded or bound edges protect the edge while changing the silhouette. Many production bags combine two of these methods.
Why do painted leather edges crack?
Because the finish is harder or thicker than the edge’s movement allows, or because the build is too rigid for a flexing edge such as a flap rim or strap end. Correct formulation, thinner builds, and flexible binders solve it. Adding more coats makes the problem worse.
Why does edge paint peel off in sheets?
Peeling in sheets almost always means poor adhesion, caused by sanding dust, oil or contamination on the edge, or by skipping the primer coat. Cleaning immediately before finishing and using a proper primer prevents it.
How many coats of edge paint does a bag edge need?
Typically two to four thin coats, with sanding between some coats to level the surface. The number depends on how absorbent the edge is and how much build the finish requires. Each coat must dry properly before the next is applied.
Can all leathers be burnished?
No. Burnishing works well on vegetable-tanned leathers because their fibres consolidate under friction. Chrome-tanned, heavily finished, and very soft or oily leathers generally do not burnish cleanly and are better served by a painted edge.
How do I test edge finish quality before production?
Four checks cover most risks: visual control for coverage, level and gloss; flex testing over a small radius at corners and flap rims; thickness measurement against the approved sample; and a simple rub or adhesion test. All are quick and can be repeated per batch.
Why are edges uneven on a finished bag?
Usually because the edge thickness varied before finishing. If skiving and cutting leave an inconsistent edge thickness, the finish builds differently along its length and the unevenness only becomes visible after coating. Preparation, not the paint, is the root cause.
Is burnishing better than edge paint?
Neither is better in general. Burnishing consolidates the leather itself and ages gracefully but offers limited colour control and water resistance. Edge paint provides colour accuracy, opacity and better water resistance, and scales more predictably in production.
What causes corner chipping on painted edges?
Corners have the thinnest finish, the tightest curvature and the most contact, which makes them the first place to fail. Under-built corners, missed rounding during sanding, and insufficient coverage on the cut corner all contribute. Extra attention and a slightly heavier build at corners is the standard prevention.
How should a leather bag edge be cared for?
Keep it dry, avoid solvent-based cleaners and abrasive polishes, and avoid prolonged heat. A painted edge can be touched up over time, and a burnished edge can be re-waxed. Early attention to small cracks or lifting prevents larger repairs.
Does edge finishing affect production cost significantly?
It affects cost mostly through labour and rework rather than materials. A multi-coat edge on a large bag can consume more finishing time than many other operations, and defects found after assembly cost several times the original work to correct.
The Bottom Line
Edge finishing rewards preparation far more than it rewards product choice.
Cut and skive consistently so the edge has a uniform thickness. Sand and clean so the finish can bond. Match the method to the leather: paint where colour and uniformity matter, burnishing where the material itself is the point, folded or bound construction where the rim is a design feature. Build thin coats, allow real drying time, and test for flex cracking rather than assuming it.
Then check the edges as deliberately as you check stitching. Coverage, level, thickness, gloss and flex performance form a small checklist — and that checklist is what separates an edge that ages well from one that chips in a season.
